Hassle Free, Gluten Free cookbook: Recipes from peanut butter cheesecake to doughballs
After her son was diagnosed with celiac disease, Jane Devonshire made it her mission to make eating easier for him, and the thousands of other people who cannot eat gluten

Your support helps us to tell the story
From reproductive rights to climate change to Big Tech, The Independent is on the ground when the story is developing. Whether it's investigating the financials of Elon Musk's pro-Trump PAC or producing our latest documentary, 'The A Word', which shines a light on the American women fighting for reproductive rights, we know how important it is to parse out the facts from the messaging.
At such a critical moment in US history, we need reporters on the ground. Your donation allows us to keep sending journalists to speak to both sides of the story.
The Independent is trusted by Americans across the entire political spectrum. And unlike many other quality news outlets, we choose not to lock Americans out of our reporting and analysis with paywalls. We believe quality journalism should be available to everyone, paid for by those who can afford it.
Your support makes all the difference.Chilli pork spare ribs
We eat these all year round, often as starters or nibbles, but sometimes with egg fried rice (see page 206) for a light supper. They pack a real flavour punch and are so easy to make – everything is prepared straight in one pan on the hob.
Serves 4
1 x 750g rack of baby back pork ribs, chopped into individual ribs
3 tablespoons sunflower oil
1–2 red chillies, finely chopped
1cm of fresh ginger, grated
4 garlic cloves, finely chopped
3 tablespoons golden syrup or runny honey (I prefer syrup as it gives the stickiness without the distinctive honey flavour) *
2 tablespoons dry sherry or rice wine
140g tomato purée
4 tablespoons gluten free dark soy sauce (I use Clearspring tamari soya sauce)
Finely sliced red chilli and spring onion, to serve (optional)
sea salt
*check for gluten content or cross contamination
Place the ribs into a large wok or non-stick pan with a lid. Measure out the 3 tablespoons of oil (don’t wash the measuring spoon) and add to the pan with a good pinch of salt.
Add the chillies, ginger and garlic, and use the oily measuring spoon to measure out the golden syrup or honey (this stops it sticking to the spoon and makes life much easier).
Finally, add the sherry, tomato purée, dark soy sauce and 125ml of water, and use a spatula to mix all the ingredients together until the ribs are well coated in the sauce.
Put the lid on the pan, place it over a low heat and cook for around 1 hour, stirring every 20 minutes to ensure the ribs are evenly coated; check more regularly towards the end of the cooking time to ensure they’re not burning. The ribs need to be a dark red caramel colour with a thick sauce; when tested with a knife, the meat should be really tender so it comes away easily from the bone.
Leave the ribs to sit, covered, for 10–20 minutes, then serve directly from the wok or pan, or transfer to a serving platter, sprinkled with finely sliced chilli and spring onion.
My Tip: To test the heat of a chilli, I cut the green top off and put it to the tip of my tongue; I can usually ascertain the heat from this touch. Another method of controlling the heat of chillies is to leave the chilli whole, just slice down the middle, and place it in the dish while cooking; as soon as the dish is the right heat for me, I remove the whole chilli.
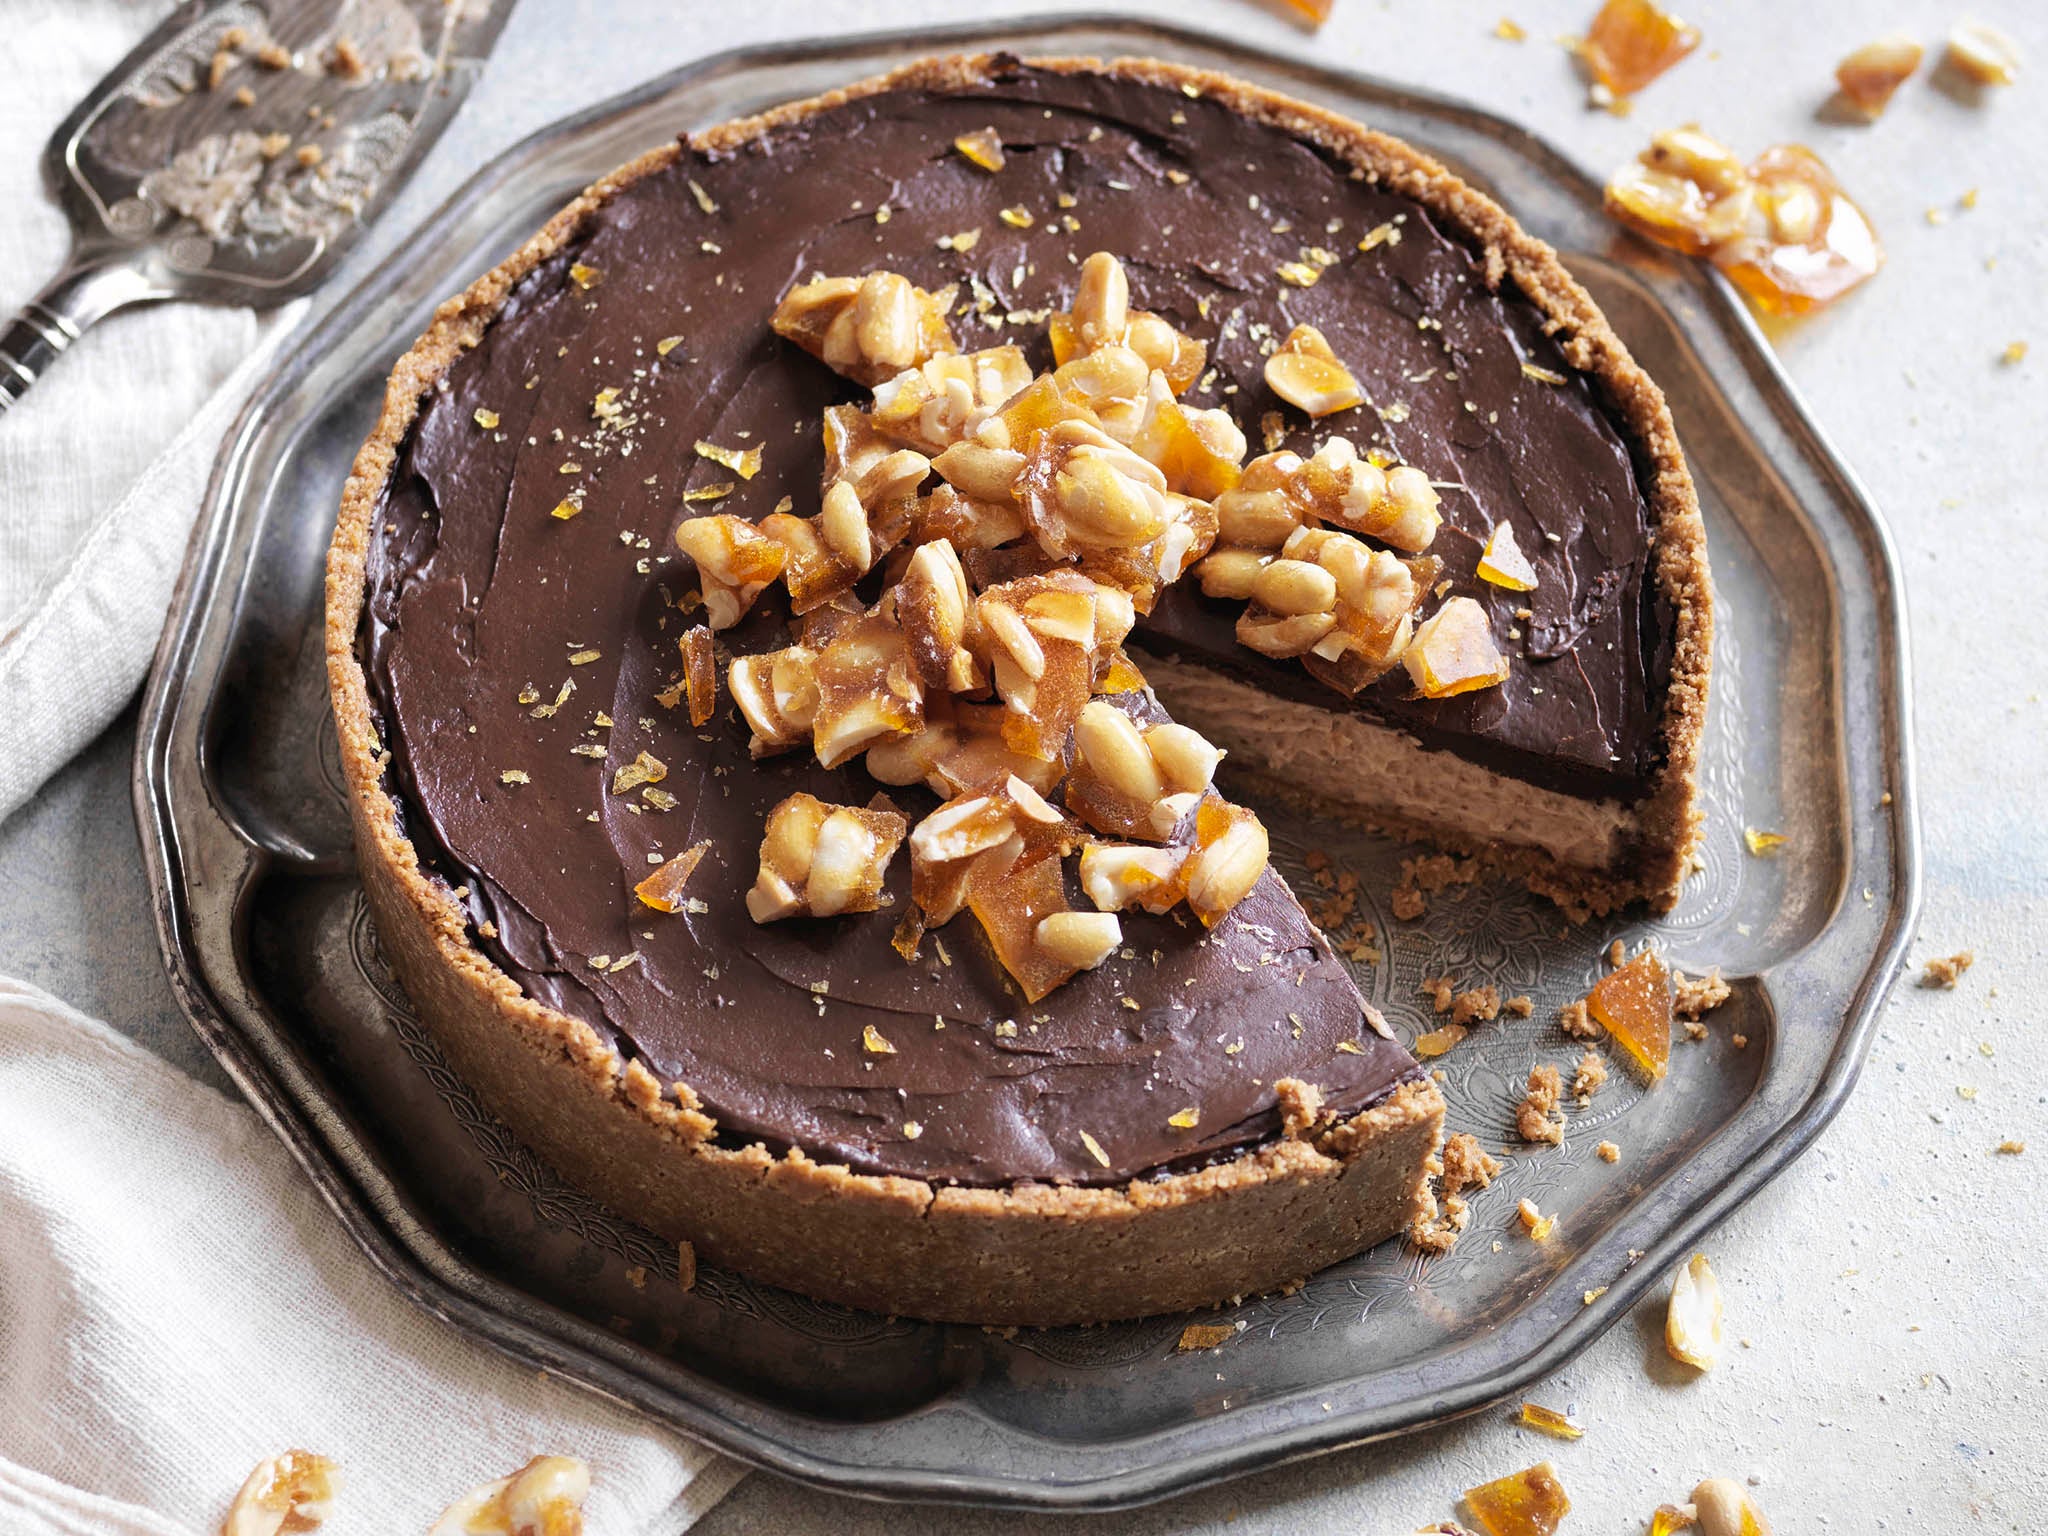
Peanut butter cheesecake
I make no apologies for this cake – it is laden with calories in every way! It is, however, Ben’s favourite, and I make it for very special occasions. It is not difficult, as the only cooking involved is melting the chocolate for the topping. Feel free to decorate the top of the cheesecake with crushed peanut brittle, chocolates, gold leaf – whatever takes your fancy! – or just leave it plain. If desired, you can halve the mixture and make individual cheesecakes in muffin trays – they’re great fun, although a little fiddly.
Serves 8–10
300g gluten free digestive-type biscuits; I use 2 packs of gluten free Hob Nobs
150g unsalted butter, melted
1 x 340g jar of gluten free crunchy peanut butter (I like the texture, but use smooth if you prefer)
280g cream cheese
2 teaspoons vanilla bean paste
125g icing sugar
150ml double cream
For the topping
100g gluten free dark chocolate,
70 per cent cocoa solids, finely chopped
100ml double cream
You will need
A 25cm non-stick spring form cake tin
In a food processor, blitz the biscuits to a fine crumb. Combine the blitzed biscuit crumbs with the melted butter, then use the mixture to line the bottom and halfway up the sides of the tin. Place in the fridge for 30–40 minutes until set and hard.
Put the peanut butter, cream cheese, vanilla bean paste and icing sugar into a food processor and whizz until fully combined; alternatively you can use an electric hand whisk for this.
In a separate large bowl, whisk the double cream until soft peaks appear. Take a tablespoon of the peanut butter mixture and, using a spatula, gently fold into the cream, trying to retain as much air in the mix as possible. Repeat until all of the peanut butter mixture is incorporated into the cream.
Add the mix on top of the crumbed biscuit base, being careful not to disturb the sides. Place in the fridge and chill for 2–3 hours until set. You can freeze this now, or keep it covered in the fridge for up to 48 hours. For the topping, place the chocolate in a large bowl. Heat the cream in a pan until just boiling, then pour over the chocolate and whisk until the chocolate is melted and the mixture is smooth.
Take the cheesecake straight from the fridge and pour over the ganache, working from the centre outwards. Return to the fridge for 30 minutes or until the chocolate is set. Remove the cheesecake from the tin – you will probably need to carefully run a knife around the edge of the cake – and serve.
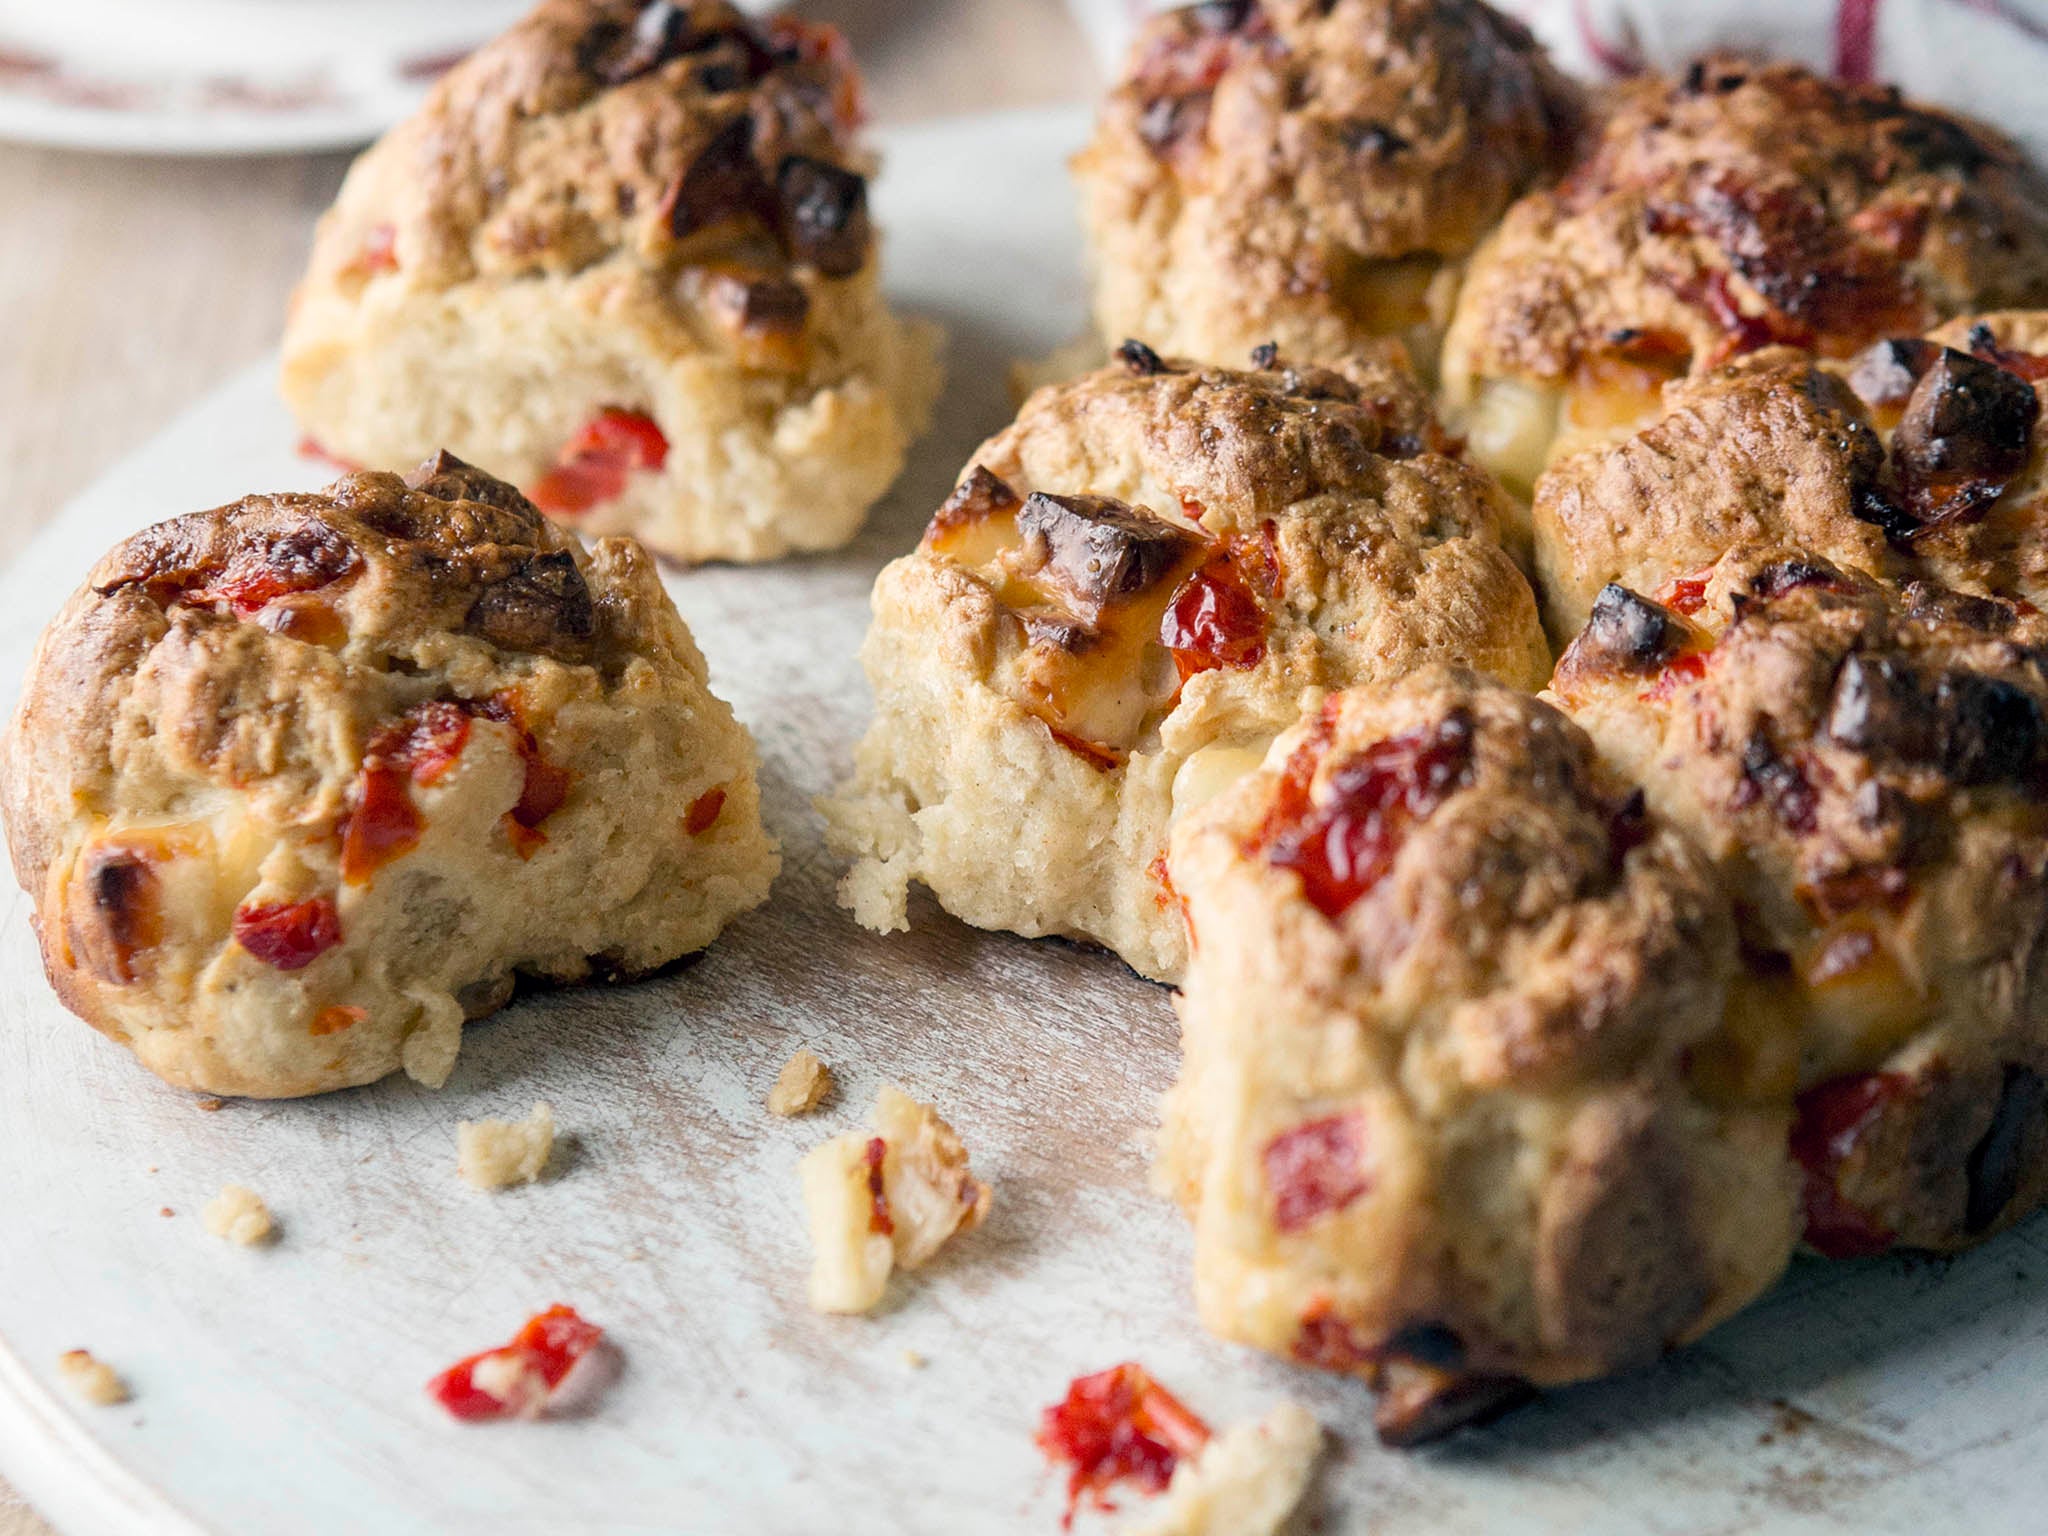
Tear-and-share doughball bread
One of the best ways to eat these dough balls is with lashings of garlic butter, but I have also included halloumi and the little piquanté peppers from a jar. You can add any flavourings that take your fancy, really.
Serves 6–8
300ml warm milk
2 x 7g sachets gluten free, fast-action dried yeast
2 teaspoons caster sugar
375g gluten free plain flour
1 tablespoon xanthan gum
2 teaspoons sea salt
1 teaspoon olive oil
1 egg, beaten, to egg wash
Additional flavours (optional)
1 x 225g pack halloumi, diced into 1cm cubes
100g mild piquanté peppers, from a jar, chopped
You will need
A 21cm round, 7cm deep spring form tin
In a bowl, combine the warm milk with the yeast and sugar and set aside for 5–10 minutes until a head has formed, similar to the froth on a pint of beer; if it doesn’t form, your yeast may not be active, so discard and start again.
Weigh out the rest of the dry ingredients into a bowl. Once the milk and yeast mixture is ready, add it to the dry ingredients with the olive oil and combine to form a dough using an electric whisk. If the mixture is a little wet, add more flour. Add any additional flavours such as the halloumi and peppers now and incorporate into the dough.

Divide the dough into ten equal-sized pieces and roll each into a ball (roughly the size of a table tennis ball). Starting in the middle of the tin, place them around the tin so they form a flower shape. Set aside in a warm place for 45–60 minutes, until the dough has risen to the top of the tin.
Preheat the oven to 220C/200C Fan/Gas Mark 7, and egg wash the top of the risen dough.
Place in the oven for 45–60 minutes, until risen and golden. When you tap the bottom it should sound hollow. This is great served as part of a sharing platter or with soups.
Extract taken from 'Hassle Free, Gluten Free' by Jane Devonshire (Absolute Press, £22) is out now. Photography © Mike Cooper
Join our commenting forum
Join thought-provoking conversations, follow other Independent readers and see their replies
Comments