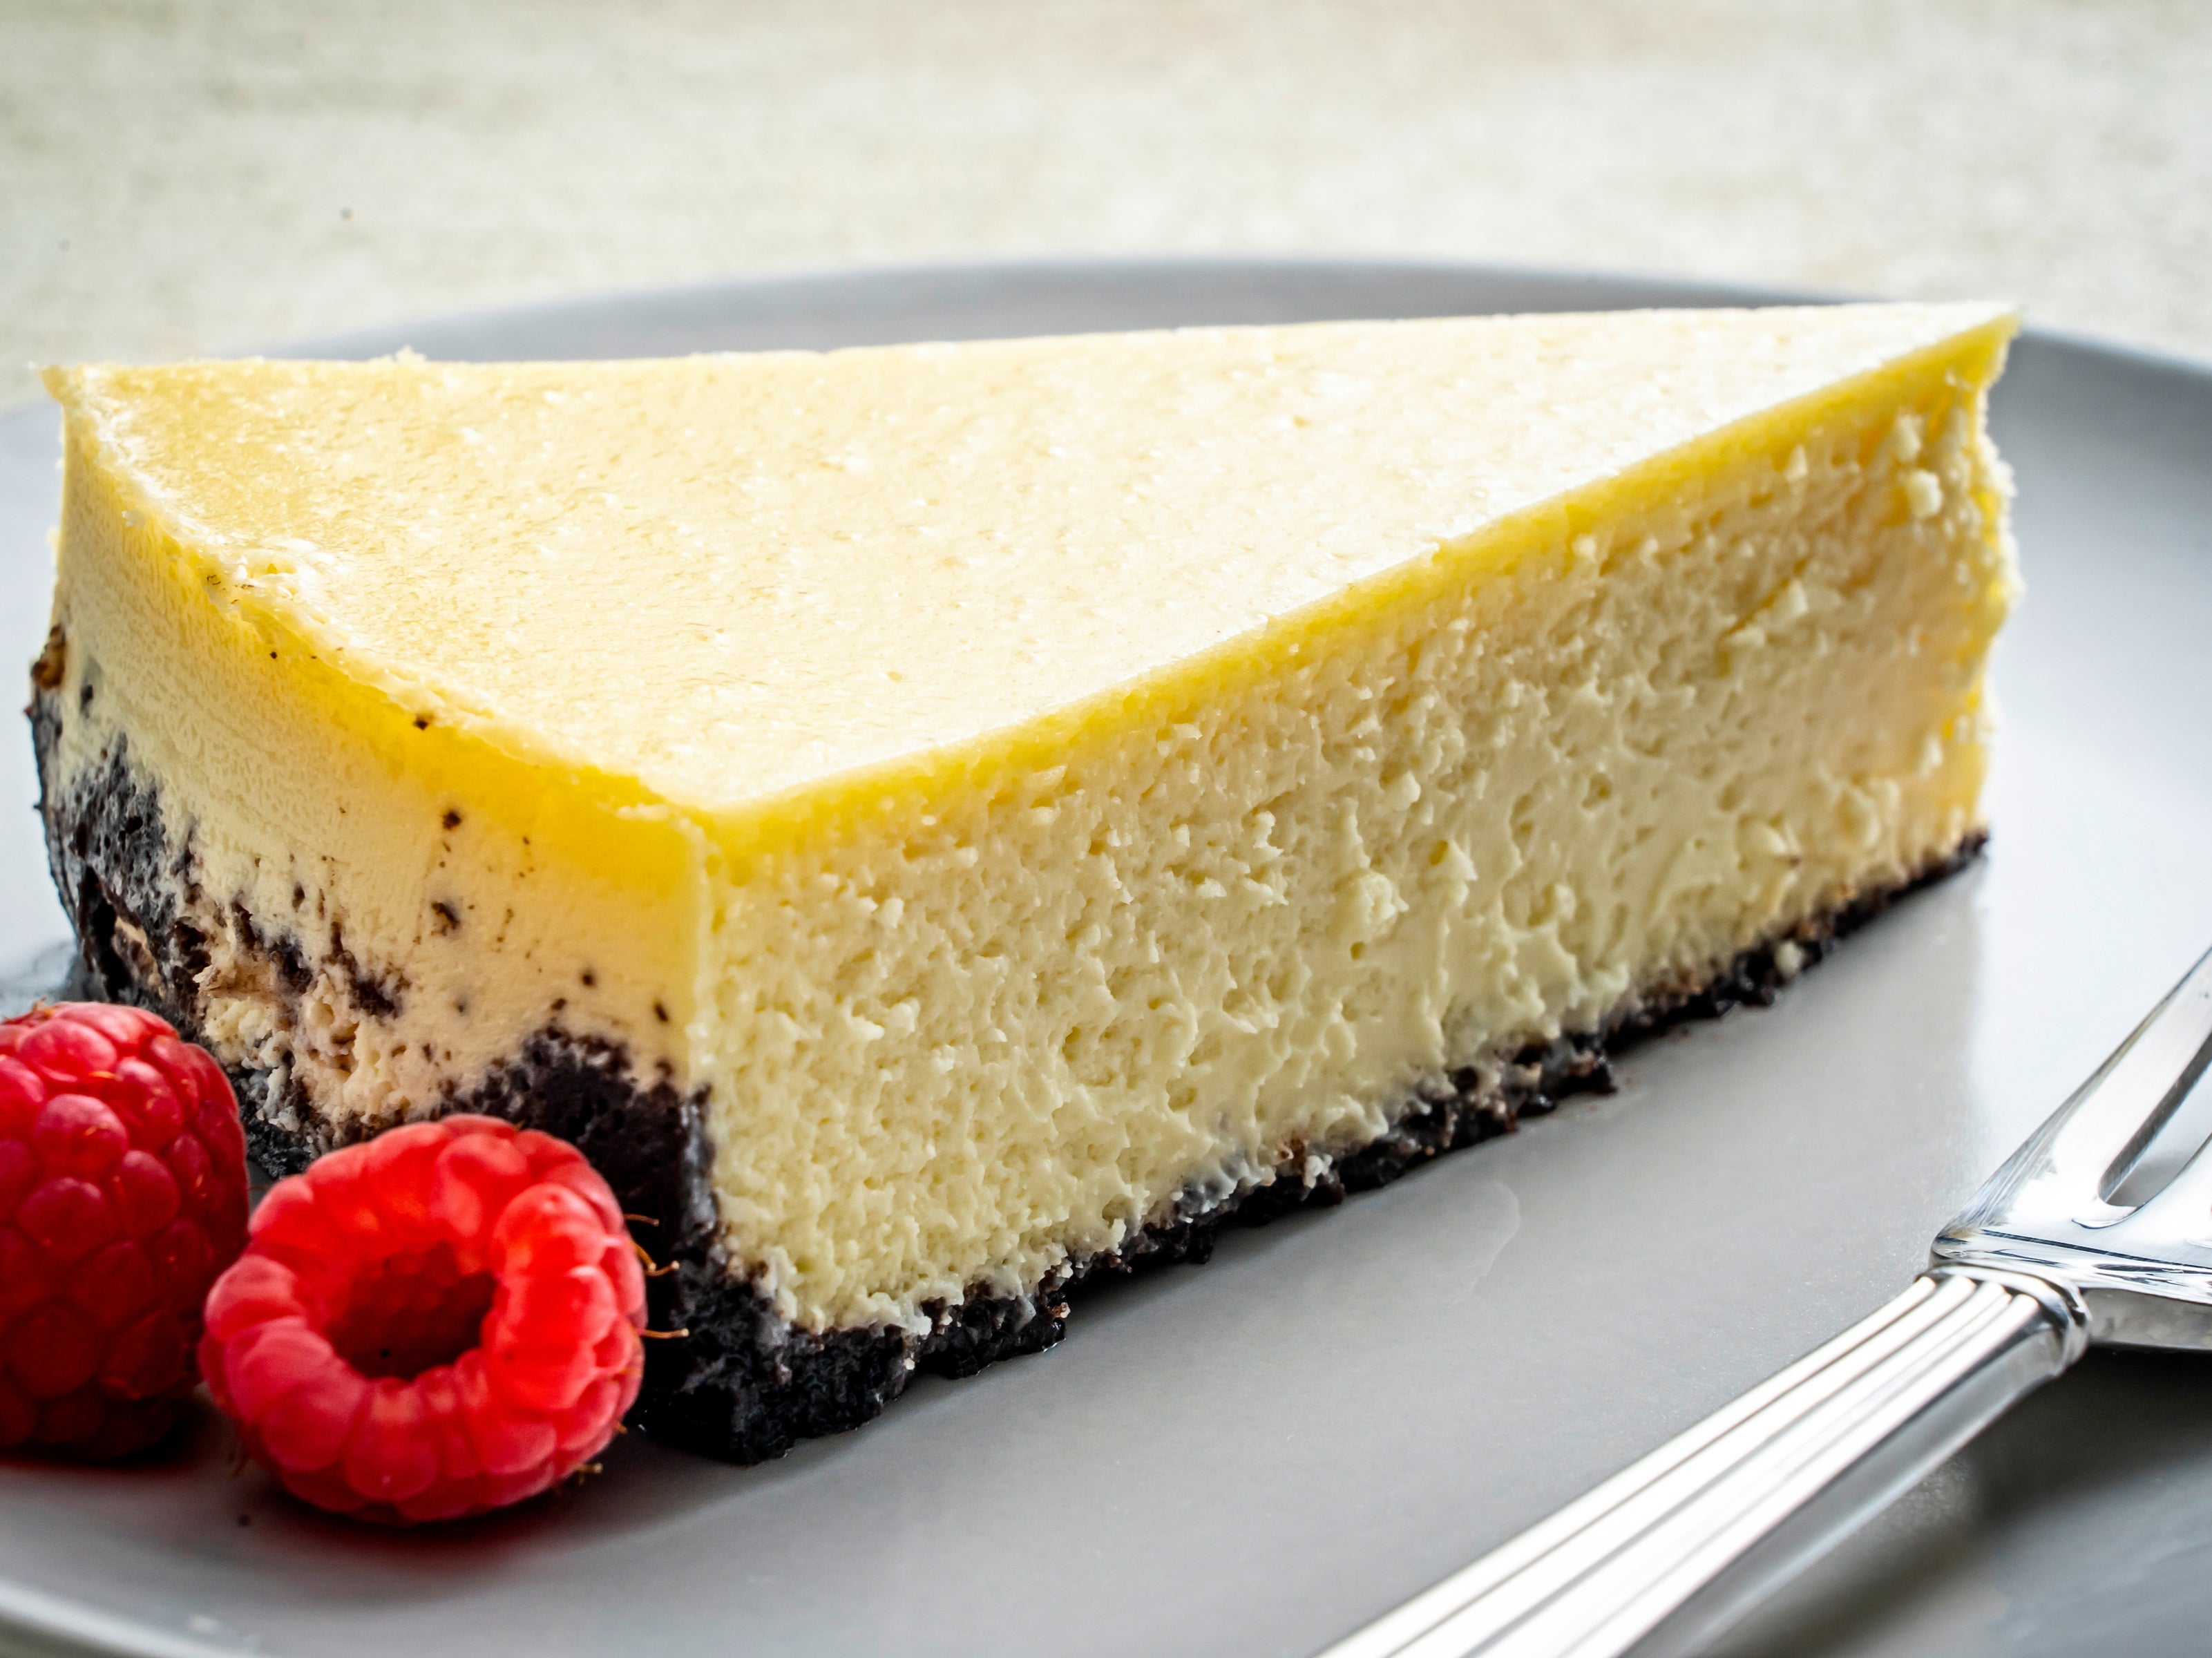
You can achieve perfectly fluffy cheesecake overnight – here’s how
The ease and resulting smoothness of this recipe from Becky Krystal cannot be beat
Sign up to IndyEat's free newsletter for weekly recipes, foodie features and cookbook releases
Get our food and drink newsletter for free
What makes a good cheesecake? Is it tall and fluffy, or dense and creamy? What’s the right balance of sweet and tangy? Can you make it without a water bath? Is it fast or foolproof? Does it really have to be made in a springform pan?
I had to ask myself all these questions and more when I started researching and testing (and testing and testing) what ultimately became this overnight New York-style cheesecake recipe. Developing recipes requires more introspection than you might think, but also often a hefty amount of exchange with others. If folks like me are going to be real, the attribution on a recipe would read more like movie credits and less like a single line, thanks to everyone who answers my questions, edits and tests my recipes, styles the food and takes the photographs, just to name a few parts of the process.
I knew I wanted a cheesecake that was smooth as silk, not overly sweet and achievable by even cheesecake novices who may be wary of the water bath they’re often baked in. Then it was a matter of researching, reaching out to all the other smart people I know and, of course, making lots of cheesecakes.
Way back in 1996, cookbook author Andrew Schloss published several recipes using a low-and-slow baking method, in which the cheesecakes bake in a 95C oven for six to eight hours. This eliminates the need for a water bath, which is designed to keep the batter below the temperature at which water boils, to prevent a cracked, grainy cheesecake. At 95C, that risk is moot. Many recipes instruct you to pull out a cheesecake once it registers 65C, but in testing the low-and-slow method, I never found that the cake got higher than around 80C (the temperature at which custards set). And I got nothing but a still gently wobbly cheesecake that set to perfection after cooling and chilling. To me, the trade-off in time – almost all of it hands off – was well worth the end result.
I tweaked almost all the ingredients in Schloss’s original brandy cheesecake to achieve an alcohol-optional dessert that is rich and creamy with a lightened texture just this side of fluffy. Instead of relying only on cream cheese (pro tip, go to Costco for the 1½kg bricks of Philadelphia brand), I swapped in some double cream and sour cream for an ethereal filling which a fork glides through like a hot knife through butter.
Along the way, I got help and inspiration from others. I followed the lead of cookbook author Erin Jeanne McDowell, who assembles her cheesecake using a food processor. The ease and resulting smoothness cannot be beat. Erin, as well as chefs Matt Adler and Alex Levin, gave me suggestions on pans, crust formulas and removal techniques. Ditto my colleague G Daniela Galarza, who urged me to give up the springform in favour of a regular cake pan (see the notes at the bottom of the recipe for this option). And to ensure I had well and truly nailed it, I handed the recipe over to recipes editor Ann Maloney and a non-staff tester (hey, Debi!). Success.
So now that the hard work is done, there’s only one cheesecake question you need to ask yourself: what are you waiting for?
Overnight New York-style cheesecake
Active time: 30 minutes | Total time: 6 hours 30 minutes, plus cooling time
Serves: 16 to 20 (makes one 23cm cake)
If you dream of making lofty, creamy and fluffy cheesecakes, but have been too intimidated to try, you’re going to love this stress-free recipe. A low-and-slow bake at 95C eliminates the threat of cracks and the need for a water bath.
The low temperature means you have flexibility in how long and when you bake – overnight is great, but you can assemble it first thing in the morning to bake during the day. Anywhere from six to eight hours works well, and a little longer won’t harm things, either. After cooling on the counter for a few hours, the cake is chilled overnight.
Philadelphia is our preferred brand of cream cheese. Stabilisers in cream cheese vary from brand to brand, and this is the one label that will get you consistent results. Be sure it’s at soft room temperature – place on the counter for at least a few hours or, even better, overnight or the whole day.
Make ahead: The cheesecake needs six to eight hours to bake, plus an overnight chill, so it’s best made a day in advance.
Ingredients:
For the crust:
2 tbsp unsalted butter, melted, plus more, softened, for greasing the pan
100g chocolate wafers or graham crackers (from about 15 wafers or 7 graham crackers)
1 tbsp granulated sugar
For the filling:
3 packages/680g full-fat cream cheese, preferably Philadelphia brand, at soft room temperature
200g granulated sugar
240ml double cream, at room temperature
113g sour cream, at room temperature
4 large eggs, at room temperature
2 tbsp liqueur, such as brandy, Grand Marnier or amaretto (optional)
1 tbsp vanilla extract
1 tbsp fresh lemon juice
Method:
Position a rack in the middle of the oven and preheat to 95C. Generously grease the bottom and sides of a 23cm round springform cake pan, with softened butter. Cut out a circle of parchment and use it to line the bottom of the pan, if desired (this is especially helpful if you want to be able to easily remove the cake from a pan with a recessed base, as opposed to a pedestal-style). Set the pan on a large, rimmed baking tray to catch any leaks and to help move the pan in and out of the oven.
Make the crust: in the bowl of a food processor with a capacity of at least 1.7L, process the chocolate wafers or graham crackers and granulated sugar until combined, about 30 seconds. Add the melted butter and process until the crumbs are damp, about 30 seconds more, stopping to scrape down the sides and check for dry crumbs (alternatively, in a medium bowl, combine the crumbs, butter and sugar and mix with a flexible spatula or with your hands).
Transfer the crumbs to the prepared pan and, using your fingers or the bottom of a dry measuring cup, press firmly into the bottom of the pan and about 6mm up the sides.
Make the filling: wipe out, rinse and dry the food processor bowl. In the bowl, combine the cream cheese, sugar, heavy cream, sour cream, eggs, liqueur, if using, vanilla and lemon juice. Process until the mixture is smooth, 1 to 2 minutes, stopping to scrape down the sides and bottom of the bowl and to check for lumps of cream cheese. Remove the bowl from the processor base and scrape down the sides one more time.
Pour the cream cheese mixture into the prepared pan. If you see a lot of bubbles on top, gently pop them with a fork or knife tip.
Transfer the pan with the baking tray under it to the oven and bake for 6 to 8 hours. The cake will still jiggle slightly when shaken, the top will range from fairly pale to light golden, and the surface should be free of cracks, though you may have a few small air bubbles. An instant-read thermometer inserted in the centre of the cake should reach at least 65C and no more than 95C (it will probably be somewhere around 80C).
Transfer the cake pan to a wire rack and cool until barely warm, 90 minutes to 2 hours. During this time, the cake should pull away from the sides of the pan. If not, address any stuck areas by running a small butter knife around the edges. Transfer to the refrigerator to cool at least overnight, covering after the first few hours.
When ready to serve, remove the sides of the pan from the cake. If desired, slide the chilled cake directly onto a serving platter using a large cake or offset spatula (this is simpler if you’ve used a pan with a pedestal-style base). If you’ve lined the pan with parchment, slide a long knife between the cake and the parchment paper. Pull out the parchment and place the cake on a serving plate. You can also serve the cake from the base of any style of springform pan. Cut with a long, sharp knife dipped in warm water to prevent sticking.
Notes:
We use the food processor to make the batter, following the lead of cookbook author Erin Jeanne McDowell, especially because we’re already pulling it out to make the crust. If you’d rather use a stand mixer fitted with the paddle attachment or a hand mixer with a large bowl to make the batter, work on low speed, first beating the cream cheese until smooth. Then beat in the sugar, followed by the double cream, sour cream, liqueur, if using, vanilla and lemon juice, scraping down the bowl as needed. Add the eggs, one at a time, ensuring each is incorporated before adding the next.
If you want to make this cake in a standard cake pan, generously grease the bottom and sides of a 23cm round cake pan with softened butter. Cut out a circle of parchment and use it to line the bottom of the pan. Then, bake as directed.
To invert the cheesecake from the cake pan (or from a springform pan, if you don’t want to serve it on the base), slightly warm the bottom of the pan to warm the fat in the crust and ensure an easier release. You can use a kitchen torch, set the pan on a warm, wet towel or place it over a burner set to low – just a few seconds will do. Cover the pan with a sheet of parchment paper, wax paper or plastic wrap and an inverted plate. Holding the plate tight to the pan, invert both. If the cake doesn’t come out, don’t panic, just heat the bottom of the pan a few more seconds and try again.
Remove the pan and the parchment, if you lined the pan with it (you can refrigerate the upside-down cake until you are ready to serve, if desired). Invert a serving plate over the cheesecake and then flip the whole thing so the crust is back on the bottom. Remove the top plate and the paper or plastic wrap. Cut with a long, sharp knife dipped in warm water to prevent sticking, or cover and refrigerate until ready to serve.
How to store: The cheesecake can be covered and refrigerated for up to 5 days.
Nutrition information per serving (using chocolate wafers), based on 20 | calories: 261; total fat: 20g; saturated fat: 12g; cholesterol: 96mg; sodium: 190mg; carbohydrates: 16g; dietary fibre: 0g; sugar: 14g; protein: 4g.
This analysis is an estimate based on available ingredients and this preparation. It should not substitute for a dietitian’s or nutritionist’s advice.
© The Washington Post
Subscribe to Independent Premium to bookmark this article
Want to bookmark your favourite articles and stories to read or reference later? Start your Independent Premium subscription today.
Join our commenting forum
Join thought-provoking conversations, follow other Independent readers and see their replies